Friday 31 August 2012

MAC Prep + Prime - Skin Base Visage Primer!

Hello lovelies! Today i have MAC's Prep + Prime Skin Base Visage to show you (bit of a mouthful) - basically a primer. You basically apply this before makeup and it's supposed to 'Calm and soothe the skin, blot away excess oil, and even out skin redness' and also 'Improve the laydown and application of foundation or powder'. An all-round product then? It costs £19.50 for 30ml of product from MAC online/store. 

Photobucket

Photobucket
The primer comes in a nice, slim, black bottle with little speckles of glitter all over it. It looks pretty cute but the black, opaque packaging means you can't see how much product you've used which can be pretty annoying. But, i have had this for ages and it doesn't seem to be running out every time soon. 

I usually use a small, pea size blob of this (slightly less than foundation) and massage into my face using clean hands. It's got a really smooth consistency and feels light on the skin. It's white in coloured but blends transparent into the skin and it's also infused with little specks of shimmer. I don't really like the shimmer particles they look quite obvious when it's applied online and enhances visible pores and oily skin. 

Photobucket
As a primer it does really help the application of foundation to be smooth and easy. And creates a smooth, even base for it to apply onto. Apart from that though i don't really see much differences when i do/don't use it. For the price i'm disappointed it doesn't do more! Makeup doesn't last any longer and the shimmer just makes my nose area look worse. But i think for those with drier skin types it will help foundation go on easier and the shimmer will brighten the skin and give your skin a glow. 

But, i wouldn't recommend it as i'm pretty sure there are similar/better products out there for £19.50 or less. But hey ho, that's just my opinion.

If you've tried it - what do you think?

Wednesday 29 August 2012

NYX Lip Liners - 'Natural' & 'Sand Pink'.

Today i have two lip liners to share with you. NYX Slim Lip Pencils! I got mine from Beauty Joint (here) and they convert from 2.99 dollars to £1.88 each. They do a large array of colours so you're definitely spoilt for choice! I went for two shades: a natural one, so i can wear it under any lipstick and a pink one as i mainly wear pink lipsticks.

Photobucket

Photobucket
Left - Sand Pink      Right - Natural

There's not much to say about the packaging they are small, slim and sleek so no hassle to carry around or store. They're like any other lip liner, in a pencil form. They require sharpening but, i haven't had to do that yet as they seem to last really long anyway. The liners aren't soft and creamy but neither are they harsh or hard to draw with. They have a nice firm texture to ensure the lipstick can grip to them and make it last longer. They are really long lasting (all day!). I think for the price they are a seriously amazing and will save you a lot of money.

Photobucket
'Natural' is as the name says - natural. It really is a 'lip colour'. A mix of brown and pink so it's not even detectable on the lips. I think this will suit most people lips and blend in really well. It's suitable under any lipstick and helps to prolong the wear. I love it, so versatile!

Photobucket
'Sand Pink' is the brighter of the two shades and a lot more obvious than the natural shade. This as you can see is a bright, mid-toned pink - it's not too light or too deep. This can be used under a pink lipstick to help prolong the wear and maybe make it look a little brighter. Or you could also colour in your whole lips and apply a nude lipstick over to give it a tint of pink. Colourful lip liners, like this, are a good way to change the look of a lipstick you already own!

I really like both these lipliners - they are the only two i own but all i really need at the moment. I do plan to add a few more to my collection at some point but i don't feel the need to try a different brand when these are so good and so cheap!

Do you use lipliners often? If so, what's your favourite brand


Tuesday 28 August 2012

Bargain: Stila Tinted Moisturiser!

Hello all! So you've probably seen a few posts about the Stila Tinted Moisturisers due to them being on sale in Poundland for just £1. Yes £1. That is such a bargain. Unfortunately, i could not find it in Poundland (it seemed to avoid me as every bugger else could find it!). So i got mine off Ebay for a respectable £3.49 - still a pretty good bargain in my eyes! 

I've been wanting to get into a lower coverage for a long while, my skin has been really good at the moment so i didn't want to cake my face in foundation for no reason. It's "Summer" so i wanted to let my skin breathe a little bit. Also having oily skin i needed something oil free so it would last as long as possible. So of course i had to give this product a try (it saved me shelling out £33 for the Laura Mercier one). 

Photobucket
Photobucket

Onto the product, the Tinted Moisturiser comes cased in a grey, plastic bottle. It isn't the most aesthetically pleasing packaging but it's light, does the job and can be chucked around willy nilly. Perfect to take travelling or in your handbag. And the squeezy nozzle means it's really easy to control how much product you get out. I normally use slightly more than my foundation just because i'm getting use to the low coverage.

I have the shade Medium 03. The shades come in Light 1, 2, 3, Medium 1, 2, 3 and Dark 1,2,3. So there are plenty of shades to choose from although the availability isn't easy /:

Photobucket
P8210148
I used my burn as reference for coverage. 

The consistency comes out quite thick but i find it isn't too hard to blend (i use my Real Techniques Buffing Brush or Sigma Flat Top Kabuki) and looks really natural on the skin. When it's applied and blended you can't even feel it.

The coverage is low, which is what you expect from a Tinted Moisturiser it basically just events out the skintones, mutes down any redness and generally just helps to make the skin look more even. It looks like it's your skin just more flawless looking. It's great everyday when you're just nipping out for a few hours and just want to look a bit more put together. The lasting power isn't fantastic but, i have really oily skin so it'll last a lot longer on dry/normal/combo skin. On me, it's lasts around 5 hours before looking 'too shiny' but it's nothing a bit of powder won't solve. Also, this gives a natural, dewy effect anyway.


Anyway, i really like it but, that's my take on it? If you've tried it what do you think? Definitely worth the small price-tag?! 


Monday 27 August 2012

Makeup Monday: Autumn Makeup Looks! (Guest Post)

Hello Lovelies!

I’m Rebekah from ‘It’s a Kind of Lovely’, and I’m so thrilled to be doing a guest post for Nadia!  I started following Dressing Table Delights pretty much as soon as I started my blog and we’ve been in contact ever since, through our blogs and on twitter.  So now on to the post!

I wanted to do a piece on autumn makeup trends as we are going to be getting into autumn soon, and I’ve decided to be prepared this time.  Having scoured the internet for photos from all of the fall/winter fashion shows, accessing Vogue online and other fashion/beauty magazines I have put together two interchangeable looks that will give you all of the basics you need.

Firstly I’ve gone for the ‘No Makeup’ look.  Basically this entails giving your skin a flawless look and no more.  I haven’t even used blush!  The only other staple trend I have incorporated with this look is bold brows which are going to be HUGE (literally) this season.

Photobucket
Products used:

Bourjois Healthy Mix Serum Foundation – 53 Beige Clair
Laura Mercier Secret Camouflage Concealer – SC-3
Chanel Loose Powder – 20 Clair
Revlon Grow Luscious Mascara (smallest amout possible!)
MAC lipstick – Shy Girl

As this look uses minimal product, it’s great for mornings you’re in a hurry - no need to look tired if you’re running late!

The second look is a little bolder.  Big on trend in all of the fashion shows was ‘Alternative Smoky Eyes’.  Basically, create a smoky eye using any other colours except your usual browns and blacks.  Popular looks were mauvey greys – such as the Bourjois smoky eyes palette in “gris lilac”, which gives a subtle smoky grey with a purplish undertone, which I love.  But I decided to use the Revlon CustomEyes palette in 030 Rich Temptations – which incorporates some of the most popular colours of the season.  Deep Khaki greens and Plum/burgundy purples!  
I’ve teamed this with the “Rosy Cheeks” trend; which could be worn with the first look too.  And the “Bold Lip” trend; and this season, it’s deep plums and reds that are coming to the forefront of popular bold lip of choice!  Again this can be teamed with a more natural looking eye.

Photobucket
Products used:
(same base as previous look)
Revlon CustomEyes Palette – 030 Rich Temptations (applied as per guide on back of product – helpful if you’re new to eyeshadow!)
More of my Revlon Grow Luscious Mascara
MAC powder blush – Breath of Plum
Illamasqua cream blush – Lies (highlight)
Revlon Colourburst Lipgloss – 016 Bordeaux 

I can’t wait to play about with these trends, mixing them up and changing them out to get completely different looks!  What are you most looking forward to rocking in Autumn? For me I think it’ll be a bold brow and lip combo!

Rebekah xxx


It's Nadia here: As you can see Rebekah always looks amazing, her makeup looks are always so flawless - she's so good! I love this post and will be trying my best to copy ;) Thanks Rebekah!! 


Sunday 26 August 2012

DIY: At Home Facial. Sunday Pamperin'

Photobucket

We all love a good pamper right? Well i know i do. It's the perfect was to relax, treat your skin and make you feel better! So put your feet up, chill out and follow these steps for the perfect at home facial..

Step One: Steam Face

Photobucket

Photobucket

I opted to use this Lush Toner Tab this time (by adding it to the water) but you don't have to use one. All you need is a big bowl, a towel to cover your head and hot, boiled water. Just fill the bowl with steaming hot water (leave it to cool for 2/3 mins) and place your head over the bowl so the steam can get into the pores and open them up - stay like this for about 10minutes. The toner tab contains essential oils which purify your skin and help it feel supple and smooth. Tip: You could always add a few drops of your own essential oils.

Step Two: Nose Strip (optional)
Que - attractive picture..

Photobucket

Ignore the ugly picture and think of the benefits. If you tend to get a lot of blackheads on your nose, like me, these little things are saviours. I just get mine from Home Bargains or Pound shops - any nose strips will do! You just wet the nose with hot water, stick this on tight, wait around 5/10mins and rip off really fast. This just basically pulls any dirt and grim out!

Step Three: Face Mask

Photobucket

I used Montagne Jeunesse Blemish Mud Mask which aims to get rid of any spots/imprections. Just slap some on (avoid eyes) and leave to dry for 15mins(ish). This is by far the most enjoyable part - grab your brew and relax! There's also enough product for two..

Last but not least: Cleanse, Tone & Moisturise! 

I used my Simple Refreshing Face Wash Gel with my Rio Sonicleanse to really deep clean the skin. I then wiped over my face with a cotton pad and the Simple Smoothing Facial Toner which is so gentle and makes sure the skin is fully clean! I then added some much needed moisture to revive my skin using the Clinique Dramatically Different Moisturising Gel

Tah-Dahhh! 


Saturday 25 August 2012

Outfit: We're all going on a Summer holiday..

Hello! So incase i didn't already go on about it enough, yesterday i flew out of England and i'm now relaxing in the sun with my feet up and a drink in hand enjoying the Bulgarian weather! I absolutely love going to Bulgaria on holiday we always have the best time and i'm sure this time will be no different.

I've been really rubbish with outfit posts recently even though they're one of my favourites to do! So, i thought i'd share with you what i wore to the airport yesterday. I get so cold on the aeroplane for some reason and always end up shivering so i needed something that would keep me warm on the plane but not be too warm when we got to Bulgaria! Gosh it's tricky isn't it.. 

Photobucket
Photobucket
Photobucket

Top - Topshop
Pants - Zara
Blazer - Primark
Collar - Primark
Shoes - Topshop

I decided to wear these lovely pants from Zara as i've only wore them once since i got them in London. I just don't get the wear out of them and they weren't cheap either. But they're really comfy, warm but not too warm and look pretty good too! Comfort and style in one - yessss! And obviously i wore my Topshop Vectra's because i wear them every single day and they're the comfiest things i own. Sore feet is a no go. 

So what do you think? Will i do? What is your airpot style - comfort or glamour?

Thursday 23 August 2012

What's in my: Holiday Makeup Bag!

Hello! The time has come and i'm finally jetting off on holiday tomorrow! I'm not flying until 11.30pm at night and i know the whole day will absolutely drag. But, i can't wait to just get away from everything for one week and relax in the sun (and do lots of shopping of course).

Makeup wise, i don't really wear it that much on my holiday! Only at nights and i end up giving up by the end of the week hahaa. It probably looks like i'm taking quite a lot of stuff but, my skin colour changes so much - i tan so easily. So at the start of the holiday i'll be pretty pale (on my face) and by the end it'll be like 5 shades darker. So a variety of shades is needed because a ghost face just isn't attractive!

Photobucket
All my makeup is stored in this cute little MAC makeup case from the Hello Kitty collection.

Photobucket

I'm trying to keep brushes to a minimal. My Real Techniques Buffing Brush is perfect for everything base wise - foundation, powder, concealer. And the Contour Brush works for bronzer and blusher and even highlighter. For eyeshadow i just have the basics an eyeshadow brush and pencil brush both from MAC, a Muji Angled Brush and a Sigma Tapered Blending brush.

Photobucket

For foundation i am taking three in sample size containers as i won't need a full bottle of foundation and this way i can take a few different ones. I have my Stila Tinted Moisturiser in Medium 03 which is my 'now colour', MAC MatchMaster foundation in Shade 6.0 as it's slightly to dark for my 'in-between colour' and Revlon Colorstay foundation in 330 Natural Tan as my darkest colour. I'm taking two shades of concealer - my Collection 2000 Lasting Perfection concealer in Medium for my paler nights and MAC's Pro Longwear Concealer in NW35 which is was too dark and only looks right when i'm tanned. Benefit's Hello Flawess powder in Hazelnut which is also slightly too dark. And two MUA bronzers, the new Bronzed Perfection and the original bronzer in Shade 2.

Photobucket

Just in case i'm in the mood for eyeshadow i'm taking my MAC 15 Palette and my MAC 'Groundwork' Paint Pot as a base! Being multi functional i'm taking my Avon Black & Brown Kajal Stick so i can choose whichever eyeliner colour i like and the brown side is perfect for my brows. The Une Skin-glow Pencil in 2.0 really brightens up the eyes and can be used as highlighter. And last but not least, a must for me, mascara. I'm taking my N.Y.C Waterproof Mascara so i can wear it in the daytime if i want but at least at night the staying power will be even better.

Photobucket

I've tried to keep lipsticks to a minimum (which was very, very hard!) but, i can't be bothered with topping up on holiday! So i chose my two favourite lip colours NYX 'Tea Rose' and MAC's 'Twig'. Then two colourful lipsticks which are nice, hydrating and easy to wear - Revlon Lip Butter in 'Tutti Frutti' and a MAC Lip balm in 'Popster' Hello Kitty collection 

So, this is all i'm taking, i don't think i need anymore to be honest. I think i've done pretty well with my multi-tasking, versatile products. But who knows, i might chuck some more in my hand luggage or treat myself out there ;)

Do you guys think i've done a good job at keeping things to a minimum? What are your holiday makeup essentials?! 


Wednesday 22 August 2012

Bargain: MUA Blusher - 'Shade 6'!

We all love a good bargain, don't we?! Well i have one for you today. MUA blushers cost only £1 (you can get them online or from Superdrug). MUA are known for their cheap yet good quality products and this is no exception.

The blushers come packaged in a long, thin see-through case made of plastic so you can easily see the colour through. They are so small and sleek which makes them good for travelling with. For the price the packaging is really nice and good quality. No complaints so far..

Photobucket

As for the colour, this is what attracted my eye straight away. In pan in looks like a plum infused with lots of gold shimmer. But when transferred to the face it's much more purple (the pink tones aren't really evident) although it still manages to look pretty natural. It blends into the skin easily and adjusts to your skintone to give you a lovely deep, glow. The shimmer appears on the lighter parts of your cheek (cheekbones) so it's like a highlighter and blusher in one - pretty and timesaving!!

Photobucket

When looking at this blusher in store it reminded me of a certain Nars blusher that i have my eye on... 'Sin'. So obviously i had to buy it. 'Sin' is also a purple/plum shade with lots of gold shimmer. I can't say they are exact dupes because i don't own them both but looking at swatches online they are really similar. MUA do some great high-end dupes and i'm so glad i got my hands on another. It has definitely  saved me £20. Who needs 'Sin' now?..

Photobucket

I've heard lots of good things about MUA's blushers and this one definitely lived up to my expectations. It's highly pigmented so i do have to be careful not to add too much to my brush as it can be easily built up but once it's on, it's on. I find sometimes the purple in the blusher doesn't come out as bright as i'd like and may be slightly overpowered by the shimmer so i add a little spray of MAC Fix+ to my brush and this really helps to bring out the colour even more.

As you can tell, i highly praise this blusher and don't really have any faults with it. My only criticism would be the fact it does create a lot of fallout. The powder is so smooth and soft that a lot of excess powder can occur - i just pat this up with my brush and use that on my cheeks. So it isn't too much of a problem and can definitely be excused considering the £1 price tag.

Have you tried this blush or any of MUA's? What do you think of them?


Monday 20 August 2012

Makeup Monday: My boyfriend does my makeup!!

Hello! I have a different type of post today - a tag post. It's the 'My boyfriend does my makeup' tag which, i'm sure you all know about. It's just basically where your other half does your makeup without any of your help. It's just him and your cosmetics (beware!!).  

I've been wanting Mark to do my makeup for a long time, thinking he should be pretty well up on the knowledge after putting up with me and my chattering for over two years! 

What i did was give Mark basically a huge box full of makeup with different foundations, a large selection of blusher/bronzer/highlighter etc. I did not make it easy in the slightest! I also gave him my eyeshadow palettes and all my brushes so he could whatever he wanted. I didn't help him atall (i promise). It was a funny experience watching him trying to figure out what things we're and his little concentration face when he was putting it on. 

Photobucket

Who wants to see the final result? *Drum Roll please......*

Photobucket
Photobucket

All in all i don't think it's too bad! I was quite surprised when i looked in the mirror. His eyeshadow and bronzer skills aren't the best in the world and we had a bit of a disaster with the mascara but apart from that he did a darn good job!!  

Products used: MAC Match Master Foundation, Nars 'Casino' Bronzer, Illamasqua Cream Blusher in 'Seduce', Avon SuperShock Mascara, MAC 'Brown Down' eyeshadow, Mac 'Twig' Lipstick. 

So what do you think? Safe to say he's listened to me drone on about makeup for two years?! 


Friday 17 August 2012

Prairie Charms - To the Moon & Back Bracelet..

Prairie Charms is an online site selling cute, personal accessories. In their words 'You can never have too many accessories and here at Prairie we strive to update our collections on a regular basis, and better yet all our bracelets are limited edition and fully interchangeable so you can mix and match any set and be safe in the knowledge you own a gem of individuality!' and to top things off, 10% of proceeds go to Great Ormand Street Hospital 'Kiss it Better' campaign. So, you get yourself a lovely bracelet and help a good cause! 

Prairie charms have quite a small range of things to choose from as they change them up and offer new options often - which is great as you can never get bored. I got the 'To The Moon and Back' bracelet which is still available now (here). You have the option so mix and match the properties you like in each bracelet so, for example, if i wanted i could change the colour of the beads (the options are stated on the product page). This is really nice as it means you can get a bracelet you truly love, the way you like it. How annoying is it when you like a design or charm but would like it in a different colour?! 

Photobucket
Anyhow, onto the bracelet it's self. It came packaged in a lovely little package - wrapped in tissue paper, tied with thin, straggly rope with a little business card popped in too. Adorable. The parcel instantly made me smile. Inside the bracelet looked just as pretty as online. 

As you can see this bracelet is so cute, with the little ship wheel charm! It can be worn alone or layered with other bracelets.  Unfortunately the bracelet is too big for my wrists, which is such a shame as it means it doesn't look right on it's own. But layered with other black bracelets it looks pretty cool! 
Photobucket
Also for you bloggers like me, they are running 'Project Blogger'! This is basically is basically a collaboration between them and us. We get the bracelets half price so long as we feature the bracelet on our blog (10% proceeds still go to charity). They also choose winners with the best reviews who then get there own bracelet! Who wouldn't want there own bracelet made my Prairie Charms? 
For my information, go to this page here.

Have you ordered anything from Prairie Charms? Do you love this bracelet as much as i do?! 

Thursday 16 August 2012

NOTD: Green Stripes and Polka Dots!

Photobucket
I've been getting in to nail art a lot more recently. I usually just paint my nails one colour and if i'm feeling adventourous i'll add a glitter topcoat ;) A few months ago i did some bunny nails which were cute and not long ago i also had a go at ombre nails - both attempts went pretty well (shock!). But, i thought now was about time to improve my tools as i think they're the most important thing when it comes to nail art. 
I settled for these brushes off Ebay. They came so quickly - about two weeks - and look so cute with their baby pink handles. A few of the brushes are the same brushes just different sizes but it doesn't really matter as their so cheap. 
Photobucket
Tesco All About Nails 'Caribbean Coconut' (base)  -  Barry M Nail Paint '290 Spring Green' (tips/dots)  -  Random Clear Topcoat.
Photobucket
I used an a straight top brush and a thin tapered brush for this look. I used the straight brush to draw a straight line along my tip, patting it and tapping it wherever necessary to create the nicest, even, straight line that was possible. I'm not the steadiest of people. Then i used the thin, pointed brush with a blob of nail polish on the end to just dot/pat down where i wanted the polka dot to be. 

It really was that simple and looks so cute. I don't know what persuaded me to use green but it just stood out to me at the time. My left hand is significantly better than my right (oops|) due to me being right-handed. But it'll all get better in time - i hope! 

What do you think of my quick, cute, nail art? Do you do 'fancy stuff' with your nails often? Any idea's for me to give a go.. 

Tuesday 14 August 2012

Outfit: Different shades of grey..

Hello all! So i realised i haven't posted an outfit in quite a long while - which is unlike me. Now the sun has finally decided to come in England (temporarily, of course) and we have some sort of 'Summer'. I did what most Brits do and got me legs out!!

Photobucket
Photobucket
Photobucket
Photobucket
Vest Top - H&M
Skirt - Primark

I love wearing outfits like this - simple and comfy! These skater style skirts are just heaven in my eyes as you can wear them all year round, day and night. I got this one from Primark about a week ago and they had a few other colours (which i need to get my hands on!). In my eyes you can't  have too many plain, loose skirts - they just go with everything, and for £6 they are a bargain! 
I've also been loving my H&M collar even though members of my family tell me it looks like a dog collar, charmin'. What do you think?

Also you can now - Follow my blog with Bloglovin :)

Sunday 12 August 2012

Nail Care Routine! Favourite Products & Tips!

After years and years of being young and chewing at my nails i now finally have nails to be proud of. So, i thought it's about time to share some little tips and tricks and my favourite products that keep my nails healthy, strong and long.  
This nail care routine is sort of a new thing, this time last year i didn't bother with anything. I'd just paint my nails, remove the polish, paint them again etc. Now i really do look  after my hands/nails and there is a clear difference. So if you don't do anything?! START NOW.

Photobucket

Refan Hand Butter isn't easily available in the UK unfortunately (but you can get it here). Never the less i absolutely adore this hand cream - it's by far the best i've ever used. It's more of a butter than a lotion meaning it's really rich and thick so just adds so much moisture! And it still absorbs quickly and doesn't leave you with that greasy, slippery feeling (win!). I hate the feeling of dry hands so i apply this a few times a day and at night before i go to sleep.

 Burt's Bees Cuticle Cream is a new addition to my 'nail care collection' i received it for my birthday. I'm guilty, like a few of us, for not looking after my cuticles as much as i should. This has a balm like texture and takes a few rubs to warm it up. I just rub this into my finger tips (all over the nail, cuticles and around the finger) and let it absorb - it doesn't take too long! I found this has really helped strengthen my nails, keep them hydrated, smooth and moisturised. I try to always, always apply this to my nails after hand-cream.

A Curved Nail File is a necessity to me, to keep my nails growing in a nice shape and making sure there are no jagged edges that will catch then break the nail. This was a huge problem for me before, i'd catch the nail tip and it would break leaving me with one random short nail. Now i file my nails whenever one snags, before i paint my nails and just when i generally think they need re-shaping. This is quite harsh - meaning it shapes the nail so easily, one swipe and it's done! I find this is better than repeatedly having to file across the nail. TIP: Don't go back and forth, go in one direction across the nail.

Last but not least, the 'gem' of my nail care products Avon Nail Experts Strong Results. This sort of kicked of my nail care routine, i started using this and saw the difference and it just went from there. This looks like a nail polish, but when you paint it on it doesn't dry like a polish it soaks in more like an oil. What i do is paint it on, then massage it into my nail with my fingers. It smells like vanilla which is nice too! I love this product and have found it has really helped strengthen my nails (they used to just bend) and helped them grow long too.


I'm not gonna lie, my nails are by no means amazingly long and as hard as nails. But they're a huge improvement from what they were this time last year. I now feel confident going out with bare nails and this is something i do often. It's good to give your nails a break - using the routine and leaving nails bare   really helps, i can stress it enough!!

Do you look after yours nails? I'd love to hear some more tips or product recommendations :) 

Also a little manicure kit like this is great too and handy for in your bag!

Saturday 11 August 2012

MAC 'Twig' Lipstick!

Hey all! This post is far overdue, i've been meaning to share this MAC lipstick with you for god knows how long. I really love this lipstick and wear it often so i don't know why it's never got round to having it's own blogpost. But it has now...

Photobucket

Photobucket
'Twig' is one of Mac's more natural shades. It's a satin finish which means it not completely matte but nor is it shiny, it's like a semi-matte finish. This is better for people like me who have quite dry lips as it's less drying than matte formula's but still has a long lasting, opaque finish. 'Twig' is described as a 'Soft muted, brown-ish pink' and i totally agree. It's a lovely mauve, pink that isn't bright but isn't too dark. On me it's like a my lips but better and a little pinker shade which i really like as it's still really natural and literally goes with anything! I shove this lipstick on when i can't decide on any other and know it will great! 
Photobucket
The picture makes the lipstick more pink and a tiny bit lighter than it actually is.

I absolutely adore 'Twig', definitely my favourite natural lip shade. It just looks fab and lasts for ever because of the formula! I have confidence i can wear this anytime and it look great and not need a lot of maintenance which is definitely a winner in my eyes. I recommend you swatch this is and check it out - i have a hunch it may suit most skintones! I think it'd look more striking on lighter skintones and more natural on darker ones like mine. 

But, yeah, i like it - alot!! It's £14.00 from MAC but it's definitely worth the price - cost per wear ;)

 What do you think?


Friday 10 August 2012

Grazin' through my 3rd Graze box!

Hello! This post is a little different from my usual beauty/fashion related posts. Recently, i've been on a bit of a fitness kick - and it's not a fad either (well i hope not). I've been exercising around 6 times a week and eating much more healthily than before and i'm really enjoying it (especially the exercise part). But i can update you on that some other time, if you like? 

One thing i tried before my 'fitness kick' was a Graze box. There were some codes going around to get your first box free so, i thought why the hell not and decided to give it a try. 

Photobucket

Photobucket

Your Graze box arrives in this cardboard box with your four little pouches of snacks inside. It's sealed with pretty tight with like plastic, ribbon around to keep it safe. When you open it you get a napkin and a little booklet telling you what you've got in your box this time, some free codes for your friends and the nutritional facts about everything. Everything you need basically! 

So as you can tell my the title, i'm on my third box. They are £3.89 so that's just under a £1 per snack which is very good value but, spending almost £4 every week isn't ideal and could save you a fair bit of money in the long run. Just for that reason i don't get one every week, i just order one every so often when i have a few spare pounds and fancy trying some new, yummy snacks.
I'll show you what i've got in my three boxes so far.. 
Photobucket
This was my first ever box and it was absolutely delicious. I enjoyed every snack is this box! I surprising really, really enjoyed 'The British Barbecue' - which was a little mix of mini breadsticks, almonds crostini's and seeds.  But as i said, they were all delicious and pretty healthy! And i ate the flapjacks on three separate days, not all at once!Photobucket
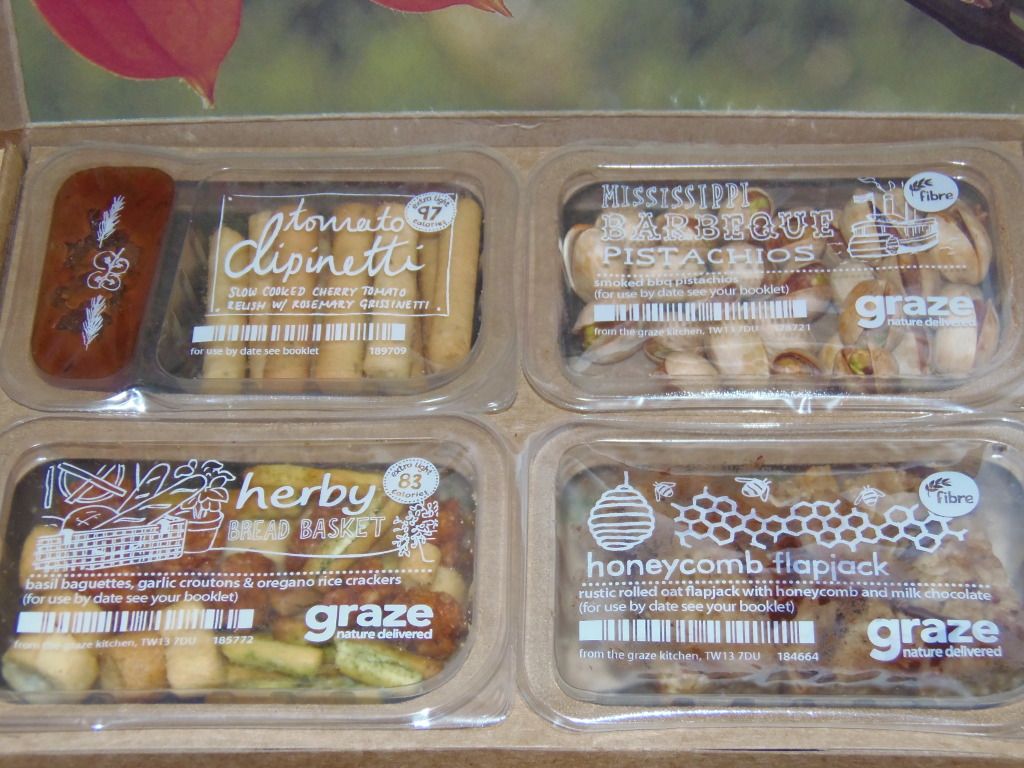
This was another really yummy box. I loved every single snack especially the 'Herby Bread Basket' which was similar to the one i loved above. It contains, mini baguettes, garlic croutons and rice crackers. The pistachio's are also delicious too, they are barbecued to have a really smokey taste! Photobucket
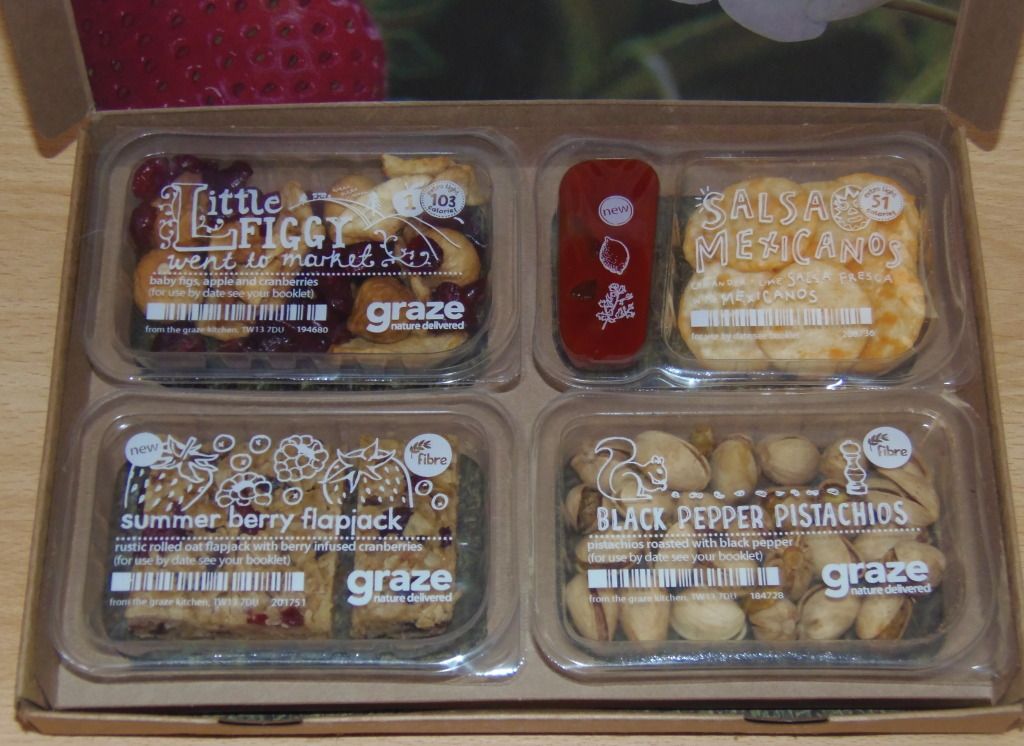
Lastly, my most recent Graze box and my least favourite! I was so excited to try to 'Sala Mexicano's', i specifically marked it as a snack i wanted to 'come soon' but unfortunately i really didn't like the crackers in it atall. It's such a shame but it wasn't for me so i used my own breadstick dipped in the salsa instead. I also, didn't like 'Little Figgy went to the market' again, it wasn't for me, it was all dried fruits and apart from the cranberries i just didn't like the taste. But, the flapjacks and pistachios were tasty -  i loved them.

So overall i've had a really good experience with Graze.com so far. I think it's such a good idea and great for those on the go people who only have the time to grab a snack on the go. I don't find these particularly filling on their own and wouldn't have them as a meal. I tend to have one of these with a sandwich or some crackers for my dinner which then really fills me up. 

On the website you can rate foods. So you can look at the snacks available and say whether you think you will like or love them and even 'bin' them (so you'll never receive it). Then once you have received the box you can rate everything you got to say whether you actually like it or not. 'Salsa Mexicano's' is definitely being binned now, i don't want that ever again! If you don't 'bin' items then it really is luck of the draw - so you could get things you enjoy, things you hate. But, ultimately a good way to try new things. 

I'm thinking of trying to re-create some of these snacks myself. What do you think? Have you tried a Graze box, will you try one after this post? 

p.s. Let me know if you liked this post and would like more healthy eating/fitness type posts!!